Checklist for successful mail sending and delivery verification
The following software will be required for further checks:
-
The host utility
- Debian/Ubuntu:
apt-get install bind9-host - CentOS:
yum install bind9-host
- Debian/Ubuntu:
-
Telnet utility
- Debian/Ubuntu:
apt-get install telnet - CentOS:
yum install telnet
- Debian/Ubuntu:
MX record
MX-record is a type of DNS-record designed to register mail servers using the SMTP protocol. This record is responsible to determine the server to which an email must be delivered by sender's mail agent. There are several records types with different priorities on one domain.
You can check if the mail works locally or uses a third-party mail server by using the host command:
host -t MX example.com
When working with the local mail server, an output will be displayed as follows:
example.com mail is handled by 10 mail.example.com.
It is worth mentioning that the mail.example.com entry can also be pointed to another server. In addition it is necessary to note that mail.example.com must be an existing A-record pointing to the server you are sending mails from.
You can also run these commands for checking:
host example.com
host mail.example.com
And compare the IP addresses to which the primary domain, in this case example.com and mail.example.com are pointed to.
An MX record is required to be set so that mail servers can receive your email.
MX record example:
Name: example.com.
Type: MX
Value: mail.example.com.
Priority: 10
DKIM-signature
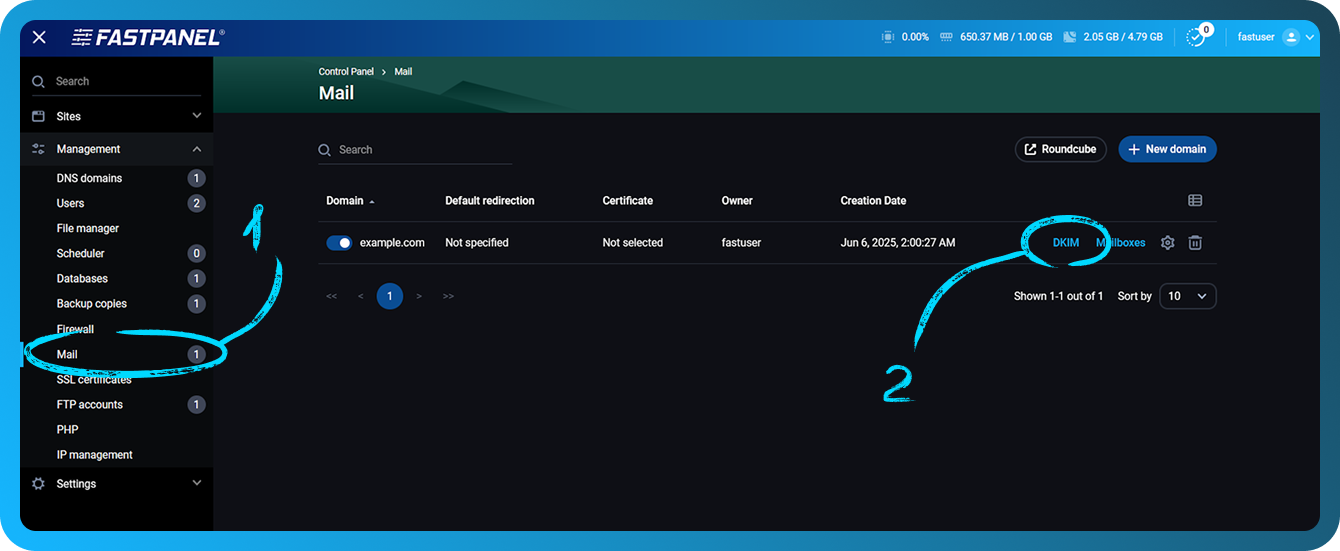
With the help of FASTPANEL® the DKIM signature can be obitailned in management menu → "Mail" section by clicking "DKIM" in front of the required mail domain
From the DNS side the record has to be added as follows:
Name: dkim._domainkey
Type: TXT
Value: v=DKIM1; k=rsa; p=public_key
Here is an example of the correct DKIM record
dkim._domainkey TXT v=DKIM1; k=rsa; p=MIGfMA0GCSqGSIb3DQEBAQUAA4GNADCBiQKBgQCpbBQ0T2xO3/SwziunIC/IFbsxBRub6WXiu8Kc2w7uB4GVw+SAB5wSEslDJbFXQRbdV9i/Duu8EQ9xik8dbqdLVyP4iAtw34g4j6QWKcfocgK4hEkwlPFff1dzUlNQONh2riNE5KVJXuWcizm8hub7nPnl36e7OnxiL0qIU7tT1QIDAQAB
More information about DKIM can be found at https://wikipedia.org/wiki/DomainKeys_Identified_Mail
SPF-record
The presence of an SPF record can be checked by executing host command. In this case, the command will look like this:
host -t TXT example.com
With the output like:
example.com descriptive text "v=spf1 ip4:ipv4_of_your_server ip6:ipv6_of_your_server a mx ~all"
Note that ipv6 may not be present in this entry. In this case the SPF signature will look like:
example.com descriptive text "v=spf1 ip4:ipv4_of_your_server a mx ~all"
It is necessary to point out that there has to be only one SFP record
On the DNS side the record should be added as follows:
Name: example.com.
Type: TXT
Value:
v=spf1 ip4:ipv4_of_your_server ip6:ipv6_of_your_server a mx ~all
or (if ipv6 is not used)
v=spf1 ip4:ipv4_of_your_server a mx ~all
For example:
example.com TXT v=spf1 ip4:1.2.3.4 a mx ~all
More information on SPF can be obtained at https://wikipedia.org/wiki/Sender_Policy_Framework
DMARC-record
In most of the cases DMARC record value will be the same.
From the DNS side the record has to be added as follows:
Name: _dmarc
Type: TXT
Value: v=DMARC1; p=none
For example:
_dmarc.example.com. TXT v=DMARC1; p=none
More information on DMARC can be found at https://wikipedia.org/wiki/DMARC
PTR record and hostname of the server
The PTR record is a reversed DNS record which converts an IP address into a name. The main purpose of this record for the mail server is to eliminate most of the spam. This record allows to determine the name of a host from which an e-mail is coming from. Most commonly a PTR-record contains a domain name used on the server.
PTR-record associates an ip-address with a host name. If PTR-record isn't specified correctly, your mails will be rejected and won't reach the addressee.
The hostname should be specified as the name of the actual domain pointing to the server, and the PTR should point to the domain, which in turn points to the server.
For example, you have a domain example.com on your server.
By running the command:
host example.com
you can get the output:
example.com has address 1.2.3.4
example.com mail is handled by 10 mail.example.com.
To avoid possible problems, it is recommended to set the hostname and PTR record as an existing second-level subdomain, for example mail.example.com
SMTP ports availability
Some hosting providers close the possibility of using ports that are used to send or receive mail. Ports for mail services can be 25, 587, 465, 143 and 993.
One of the easiest ways to check the availability of these ports is to use the telnet command.
To check the incoming connection from a third-party server
Run the command:
telnet ip_adress port
For example, if you try to telnet to port 25 at 1.2.3.4, the command to execute is:
telnet 1.2.3.4 25
If the connection is successful you will see an output like:
Trying 1.2.3.4...
Connected to 1.2.3.4.
Escape character is '^]'.
If the connection fails, the output will look like this:
Connecting To 1.2.3.4 ...
Could not open connection to the host on port some_port: Connect failed
Or:
telnet: Unable to connect to remote host: Connection timed out
For an outgoing connection
From your server, run the command:
telnet smtp.gmail.com 25
If the connection is successful you will see an output like:
Trying 2a00:1450:4010:c0b::6c...
Connected to smtp.gmail.com.
Escape character is '^]'.
220 smtp.gmail.com ESMTP j6-20020ac25506000000b004b53eb60e3csm1066162lfk.256 - gsmtp
Please note that if you use cloud hosting and use port 25 for your SMTP server, chances are your hosting provider is blocking outgoing connections on port 25 by default. Below you can see links with instructions on how to solve this problem:
- AWS: How do I remove the restriction on port 25 from my Amazon EC2 instance or AWS Lambda function?
- Azure: Troubleshoot outbound SMTP connectivity problems in Azure
- GCP: Sending email from an instance
- DigitalOcean: Why is SMTP blocked?
In addition to port blocking by your hosting provider, you need to check if the ports on your server are closed or not. Let's take for example iptables, which acts as a firewall, using the FASTPANEL control panel. The command to check if there is a rule for a specific port, in this case 25, is:
iptables-save | grep 25
If you don't have a rule for the port you want to check, no information will be given. If you see that there is a rule blocking the port of the mail service then you need to remove this rule with the command:
iptables -D rule chain
For instance, you ran a command and found the following:
iptables-save | grep 25

-A INPUT -p tcp -m tcp --dport 25 -j DROP
This rule doesn't allow any access to your server via port 25 which will prevent mailing
To remove the rule use the command:
iptables -D INPUT -p tcp -m tcp --dport 25 -j DROP
This command example allow you to check every port used for mailing
IPv6 influence on mailing
If you need to use ipv6 for your mail services, the first thing you need to do is to check if there is a PTR record for ipv6 and if the mail services are listening to ipv6 on certain ports.
You can perform the check by using the command:
netstat -nltpp | grep tcp6
The result of the output of this command will be a list of all services that use ipv6, among which you can already check if your mail service uses this address. Unfortunately, nowadays the use of ipv6 may not work correctly even if you've done all the settings correctly.
If you found out by checking the logs of the mail service that the error is related to ipv6 and the whole configuration is correct, you can disable the use of ipv6 for the mail service.
On the example of exim4 ipv6 disabling looks like this:
-
Check if the ipv6 address is used for the service with the command
netstat -nltp | grep exim
-
In the configuration file
/etc/exim4/exim4.conf.templatethe following line must be added to the very top of the file:disable_ipv6=true
-
Save changes in file and then restart the service with a command like:
systemctl restart exim4 -
Execute the command:
netstat -nltp | grep eximto check if the service is no longer in the list

Check mail sending by using third-party services
After you have checked all of the above items you can check mail sending from your server using third-party resources.
One of the most convenient and informative services is https://www.mail-tester.com
By using it you can check the current rating of your mail, get information on whether or not the data set above is correct, as well as get a recommendation to improve the rating.
To do this, just send an email to the address that is listed on the site, and then click on "Then check your score".